How to Draw Goku in His Many Forms: The Ultimate Guide. Goku, the iconic protagonist of the “Dragon Ball” series, has seen numerous transformations throughout the years. Each version brings its own flair, challenges, and artistic intricacies. For budding artists and Dragon Ball fans alike, drawing Goku in his different avatars is both a test of skill and a labor of love. This comprehensive guide will dive deep into the nuances of drawing Goku, from his base form to the electric energy of Ultra Instinct.
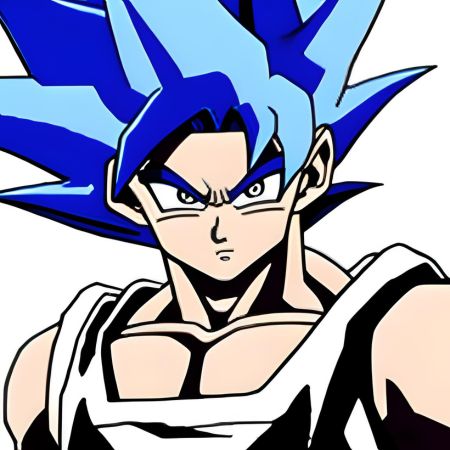
Mastering the Art: How to Draw Goku Ultra Instinct
Goku, the ever-evolving hero of the “Dragon Ball” universe, never ceases to astonish fans with his remarkable transformations. Among the most coveted by artists and fans alike is the ethereal and awe-inspiring “Ultra Instinct” form. This form embodies not only a new pinnacle of power for Goku but also a challenge for those eager to capture his likeness. If you’ve been itching to sketch this ultimate version of Goku, you’re in the right place. Let’s embark on this artistic journey together!
Understanding Ultra Instinct: More than Just a Look
Before you dive into the drawing, it’s crucial to grasp what Ultra Instinct is. Unlike other Super Saiyan forms characterized by fiery auras and electric energy, Ultra Instinct resonates with a calm yet overpowering presence. Its essence lies in movement without thought, a state of sheer reflex and raw power. This understanding will help you imbue your drawing with the depth it deserves.
For a detailed exploration of the Ultra Instinct transformation, check out Dragon Ball’s official site.
Setting the Stage: Preparing to Draw
- Pick the Right Tools: While you can use anything from pencils to digital tablets, for a detailed drawing like this, opt for finer tools that allow precision. Quality sketching pencils, a good eraser, and quality drawing paper make a difference.
- Get Reference Images: While seasoned artists might draw from memory, if you’re just starting or want accuracy, keep some reference images handy.
Anatomy and Posture: The Framework
Goku in his Ultra Instinct form is both ripped and fluid. He moves with grace, and his posture often exudes confidence.
- Start with a Skeleton: Begin by sketching a basic skeleton to determine Goku’s stance. Remember, Ultra Instinct Goku often has a more relaxed posture, symbolizing his calm state.
- Build the Musculature: Once you have the skeleton, add muscles. Goku’s physique in this form is incredibly defined, with every muscle taut and visible.
The Defining Silver Hair and Eyes
Ultra Instinct’s most defining visual features are Goku’s silver hair and eyes.
- Sketching the Hair: Unlike the regular spiky look, the Ultra Instinct form offers a slightly more raised and wilder look. The hair flows more naturally, with some strands falling on his forehead.
- Eyes with Depth: The eyes in this form are more profound. Draw narrower eyes with a sharp gaze, and don’t forget the silver irises, symbolizing his heightened reflexes.
For an in-depth tutorial on drawing anime hair and eyes, visit this expert guide.
Clothing and Aura: Finishing Touches
Goku’s attire remains largely consistent, but the aura is where you can play around and experiment.
- Capture the Attire: Goku’s torn clothes, resulting from intense battles, can be a treat to sketch. Make sure you show the wear and tear, especially around his torso and legs.
- The Ethereal Aura: The Ultra Instinct aura isn’t your typical fiery one. It’s more smoky, serene, and shimmering. Use lighter strokes and if you’re coloring, a mix of blue, white, and silver.
For tips on drawing clothing and fabric, this article by renowned artists can be immensely helpful.
Tips from the Masters
Every artist has their secrets, and when drawing a complex character like Goku in his Ultra Instinct form, it helps to know some tricks of the trade.
- Shading Matters: Proper shading can bring Goku to life. Especially focus on shading his muscles, hair, and the folds of his clothes.
- Practice the Aura: The ethereal aura can be tricky. Practice different techniques, whether it’s smudging with a finger or using brushes to create the desired effect.
- Keep the Hands Relaxed: One of the defining features of Ultra Instinct is the relaxed stance. Ensure Goku’s hands, whether clenched or open, look natural and not forced.
For more tips and techniques, a session with Manga professionals can elevate your drawing game.
Unlocking the Art: How to Draw Goku Like a Pro
Drawing Goku begins with understanding his basic anatomy, signature hairstyle, and attire.
- Start with Basic Shapes: Like many anime characters, Goku’s structure can be broken down into basic shapes. Begin with a circle for his head, and elongate rectangles for his torso and limbs.
- Capture the Hair: Goku’s hair is spiky and full of volume. Drawing it requires practice. Start with broader shapes and then refine the spikes.
- Facial Features: Goku’s determined eyes, sharp nose, and confident smirk are essential. His eyes are almond-shaped with thick eyebrows that follow a similar angle.
- Clothing: Goku’s attire, especially his orange gi, is iconic. Don’t forget the details like his blue sash, wristbands, and boots.
Goku, the heart and soul of the “Dragon Ball” series, has inspired generations. From his spiky hair to his determined eyes, he embodies strength, determination, and hope. For many budding artists and longtime fans, capturing Goku on paper is a dream. This guide will walk you through the steps to sketch this iconic character, infusing your artwork with life and passion.
The Essence of Goku: More Than Just Lines
Drawing Goku is not merely about getting the lines right; it’s about understanding the character’s spirit. Goku’s journey from a curious child in “Dragon Ball” to a universe-defending warrior in “Dragon Ball Super” showcases myriad emotions. And while techniques and tools play a role, the essence is paramount.
Dive deeper into Goku’s evolution in the series on the official Dragon Ball site.
Setting the Groundwork: Essential Tools and Preparation
Selecting the right tools sets the tone for your entire drawing experience. Whether you’re a newbie or a pro, having the right equipment can make a world of difference.
- Quality Drawing Pencils: These offer varied thickness and allow you to play with shadows and lines.
- Fine Erasers: These come in handy to correct mistakes or refine edges.
- High-Quality Paper: This ensures your sketches glide smoothly, and the paper doesn’t easily tear.
- Reference Images: Especially for beginners, having a visual guide helps. Pick multiple images that show Goku from different angles and poses.
Get recommendations for drawing tools on sites like Artists’ Essentials.
The Framework: Starting with Basic Shapes
Like any character, Goku can be broken down into basic geometric shapes, simplifying the drawing process.
- Sketch a Circle for the Head: Ensure you position it well, depending on the pose you’re aiming for.
- Draw the Torso: Using an elongated shape like an oval or rectangle, sketch Goku’s torso. Remember, Goku has a muscular build, so don’t make it too thin!
- Legs and Arms: Using lines and shapes, sketch out the basic stance for arms and legs. These will serve as guides for muscle detailing later on.
Capturing Goku’s Signature Look: Facial Features and Hair
Goku’s hair and face are distinctive. These features make him immediately recognizable, so you’ll want to give them special attention.
- Eyes: Start with almond-shaped eyes, tilting them slightly downward. Goku’s eyes are large and expressive, with thick eyebrows that almost always mirror his hair’s angle.
- Nose and Mouth: Goku has a sharp, small nose. Just below the nose, sketch a simple line for his mouth. His expressions vary, but his trademark is a confident smirk.
- The Iconic Hair: Goku’s hair is arguably his most defining feature. Begin with larger shapes to map out the volume and then refine into individual spikes. The direction and flow of the spikes can indicate wind direction and movement.
Detailed hair drawing techniques are well-explained on Anime Artistry.
Defining the Muscles and Outfit
Goku isn’t just about a well-drawn face; his physique and outfit contribute a lot to his character.
- Muscles: Based on the basic framework, start detailing the muscles on his arms, legs, and torso. Given Goku’s strength, the definition in his muscles is prominent. Use shadows to give depth.
- Clothing: Goku’s most iconic outfit is his orange gi, but he’s donned various outfits over the series. The wrinkles and folds in the fabric give the drawing a realistic feel. Pay attention to the blue sash, wristbands, and boots.
For insights on drawing anime clothing, Artistic Drapes provides great tutorials.
Polishing Your Drawing
With the basic elements in place, refine your drawing.
- Shading: Proper shading breathes life into your Goku sketch. Shade under the hair, around the neck, and areas where clothing bunches up to create depth.
- Background Elements: Depending on your scene, you might add elements from the “Dragon Ball” universe. Whether it’s the Dragon Balls, a sense of motion with speed lines, or the calming aura of energy, these elements elevate your artwork.
- Inking and Coloring: If you’re up for it, trace your pencil lines with ink for clarity. Adding color, even if just the basics, can make your Goku drawing pop.
Professional artists often share their techniques. Platforms like Skillshare offer in-depth courses on anime art.

Master the Art of Shadows: How to Draw Goku Black with Precision
Goku Black is a sinister and malevolent version, with a sleeker look and sharper angles. Here’s how you can capture this dark iteration:
- Darker Tones: Goku Black’s color palette leans heavily on grays, blacks, and deep reds. Keep this in mind, especially when shading.
- Refined Hairstyle: Goku Black’s hair is more refined and slightly more elevated than Goku’s. Ensure to add that extra flair while drawing.
- Eyes with Intent: Goku Black’s eyes are narrower, giving him a more menacing look. The irises are pinkish-red, signaling his dark intent.
Goku Black, one of the most enigmatic and sinister villains in the “Dragon Ball” universe, stands out with his unique aesthetics and chilling aura. But what’s more captivating is his uncanny resemblance to our beloved Goku, albeit with a darker, more menacing twist. If you’re eager to capture this duality on paper, this guide will pave the way for you. Let’s dive into the world of Goku Black and sketch this intriguing character to perfection.
Unveiling the Mystery: Who is Goku Black?
Before we dive into the intricacies of drawing, it’s essential to understand the essence of Goku Black. Stemming from the “Dragon Ball Super” arc, he’s not just an evil doppelganger of Goku but carries Zamasu’s ambition and desire for a world without mortals. His character design melds Goku’s familiar traits with Zamasu’s malevolent intent.
Learn more about Goku Black’s narrative and evolution in the official Dragon Ball Universe.
Preparing Your Canvas: Gathering the Essentials
A masterpiece requires more than talent; it demands the right tools. Here’s a quick checklist to set the stage:
- Quality Sketch Pencils: Ranging from soft to hard, these will help define the different shadows and lines of Goku Black.
- Erasers: Opt for both hard and soft erasers to correct and refine your drawing.
- Drawing Paper: A smooth paper ensures your pencil glides seamlessly, capturing every detail.
- Reference Images: Goku Black’s details, especially his earring and attire, require attention. Source images that provide clear, close-up views.
For budding artists, Art Supplies Hub offers a comprehensive guide on sketching tools.
Crafting the Foundation: Drawing the Base Figure
Goku Black’s physique is similar to Goku, with a lean yet muscular build.
- Start with the Head: A simple circle will set the stage. Position it according to the pose you’re aiming for.
- Sketch the Torso: An elongated shape, akin to an oval or a rectangle, will define his upper body.
- Outline Arms and Legs: Use elongated ovals and lines to map out his stance. Remember, his physique is well-defined, so keep those muscles in mind!
Delving into Details: Facial Features, Hair, and Accessories
Goku Black’s menacing look is a blend of his facial expressions, unique hairstyle, and the signature accessories he adorns.
- Eyes: Begin with the classic almond-shaped eyes but give them a sharper, more angular tilt. Goku Black’s eyes are colder and more calculating than Goku’s, often glowing with a pink hue.
- Nose and Mouth: His nose is sharp, while his smirk exudes arrogance. Drawing his mouth slightly tilted can capture his smug expression.
- The Distinct Hair: Unlike Goku’s spiky hair, Goku Black’s locks flow more smoothly, though they still stand tall. Use smooth strokes, ensuring the hair’s flow appears natural and slightly windswept.
- Potara Earring: This accessory is vital. On Goku Black’s right ear, sketch the Potara earring, a green, elongated oval shape.
For intricate details on anime hairstyles, check out Anime Hair Design Insights.
Sketching the Attire: An Ensemble of Darkness
Goku Black’s outfit is a stark contrast to Goku’s, symbolizing his corrupted nature.
- The Black Gi: Drawing his outfit starts with the black gi, which resembles Goku’s orange gi but comes with its unique flair. Sketch it flowing and slightly tattered at the edges for an authentic look.
- Red Belt and Silver Boots: The crimson belt contrasts with the dark gi, while his silver boots add a touch of sophistication. Don’t forget the Time Ring on his right hand!
If you’re looking for techniques to draw intricate fabric designs, Clothing Design Mastery is a great resource.
Refinement and Shading: Breath of Life to Your Sketch
The difference between a good drawing and a great one often lies in the details.
- Shading: This technique can transform your Goku Black drawing. Shade under the hair, below the chin, and wherever the clothing folds to create a realistic 3D effect.
- Background and Energy Aura: Drawing a contrasting background or his signature pink aura can accentuate Goku Black’s menacing vibe.
Enhance your shading skills by exploring courses on platforms like Artistic Academy.
Unleashing the Power: How to Draw Goku Super Saiyan
Drawing Goku in his Super Saiyan form is all about capturing that raw energy and explosive emotion:
- Golden Locks: Goku’s hair stands even taller, and its color turns a radiant gold. The spikes become more pronounced, giving a feel of the electric energy flowing through him.
- Aura: The Super Saiyan form is always accompanied by an aura. It’s a mix of rapid lines and electric sparks. Capture this by using rapid, energetic strokes around Goku.
- Facial Intensity: His eyes become sharper, the pupils get smaller, and the eyebrows become more pronounced.
Ah, the Super Saiyan! One of the most iconic transformations in anime history. Goku’s transformation into this golden-haired warrior left millions of fans with their jaws dropped when they first witnessed it. The fiery aura, the intense eyes, the commanding posture – every element exudes raw power. If you’ve ever wished to capture this energy on paper, you’re in for a treat. Let’s embark on a journey to master the art of drawing Goku in his Super Saiyan form.
Gearing up: The Essentials You Need Before Drawing
Before we dive headfirst into drawing Goku Super Saiyan, let’s get our arsenal ready. Here’s a quick list of essentials to kickstart your artistic journey:
- Quality Drawing Pencils: Ranging from H to 6B for varied line weights and shading.
- Eraser: For minor corrections.
- Quality Sketchbook: Preferably with a smooth finish to facilitate easy sketching.
- Reference Images: A clear picture of Goku Super Saiyan can be invaluable as a guide.
For those who are serious about their art, it’s worth checking out Arts and Crafts Guru for top recommendations on drawing materials.
Setting the Stage: The Base Sketch of Goku
Before the transformation details, you’ll need the basic shape of Goku.
- The Head: Start with a circle for Goku’s head, positioning it depending on the pose you aim for.
- Body Outlines: Draw a sturdy and muscular outline. Remember, Goku Super Saiyan carries an aura of immense power, and the physique should reflect that.
- Positioning: Depending on whether you want a battle-ready pose or a more serene one, adjust the arms and legs accordingly.
Diving into the Details: Capturing the Super Saiyan Aesthetics
Once you have the basic outline, it’s time to immerse ourselves in the details that define Goku Super Saiyan.
- Fiery Hair: The golden locks that defy gravity are a defining feature. Start with large spikes for his main hair and add smaller ones to give depth and volume. Remember, his hair isn’t just yellow – it radiates light.
- Intense Eyes: The Super Saiyan transformation brings about a change in Goku’s eyes. They become more teal and intense. Capture this with sharp, angular eyes. Add pupils that seem focused and determined.
- Muscle Definition: Goku’s muscles are more pronounced in this form. Whether it’s his bulging biceps, the detailed pecs, or the abs, ensure you add shadows to emphasize the muscle lines.
A fantastic resource to delve deeper into defining muscles in sketches is Anatomy for Artists.
Perfecting the Super Saiyan Aura
A major part of the Super Saiyan transformation is the fiery, electric aura that surrounds Goku.
- Outlining the Aura: Instead of drawing clear lines, use erratic, wavy patterns. The aura isn’t a solid entity but more of a fiery energy emanating from Goku.
- Shading and Lighting: The area closest to Goku should be the brightest, with the intensity fading as it moves outwards. Use your softer pencils to achieve this gradient effect.
Adding the Finishing Touches: Clothing and Accessories
Goku’s attire remains mostly consistent, with his signature gi.
- Drawing the Gi: His clothing is loose, so use free-flowing lines. The folds in the fabric can be accentuated with subtle shading.
- Accessories: Don’t forget his wristbands and boots. They may seem minor, but they complete the look.
If you’re looking to master the art of drawing fabric and clothing, a visit to Drawing Fabric Essentials might be beneficial.
Elevating Your Art: Techniques to Enhance the Drawing
Drawing Goku Super Saiyan isn’t just about getting the form right; it’s about imbuing your artwork with energy and emotion.
- Dynamic Shading: By effectively shading, you can make Goku seem three-dimensional. The areas under the hair, the folds of the clothes, and the muscle recesses should be darker, giving depth to your drawing.
- Background Elements: Consider adding elements like rocky terrains or a destroyed landscape. It can provide context to Goku’s powerful transformation.
- Incorporate Movement: Make your drawing seem alive by adding movement lines, especially around the hands or legs, as if Goku is about to launch into an attack.
Simplifying the Process: How to Draw Goku Easily
For those who are new to drawing or just want a simplified version of Goku, this section is for you:
- Stick to Basic Shapes: While the advanced forms of Goku have nuanced shapes, an easy version can stick to circles, rectangles, and triangles.
- Simplified Hair: Instead of numerous spikes, you can draw just a few to capture the essence of Goku’s hairstyle.
- Facial Features: Draw broader, less detailed eyes, a simple nose, and a smile to bring out Goku’s cheerful nature.
“Dragon Ball Z” and its iconic protagonist, Goku, have inspired countless fan art pieces, cosplay events, and heart-pumping memories of epic battles. Yet, when it comes to drawing Goku, many fear the challenge, thinking that capturing his essence on paper is reserved for professional artists. But what if we told you that with the right approach, anyone can draw Goku with ease? Let’s demystify the process and learn how to bring the beloved Saiyan to life, even if you’re an absolute beginner!
The Power of Starting Small: Simplifying the Goku Form
Goku is renowned for his spiky hair, muscular build, and trademark fighting gi. But, like any great masterpiece, the secret lies in breaking it down into digestible bits.
- Face Basics: Begin with a round shape for the face. Instead of immediately diving into the intricate details, focus on getting the basic shape correct. This serves as your guiding framework.
- The Goku Hairstyle: Simplify his iconic hair by drawing big spikes. Three spikes on each side and a couple at the top should do the trick for a beginner sketch.
- Body Framework: Use simple shapes. A rectangle for his torso and thinner rectangles for his arms and legs.
Familiar Features: Adding Goku’s Facial Details
A few distinct touches can easily transform a generic face into Goku’s.
- Eyes: Draw two symmetrical almond shapes. Add a small curve for the nose in the middle and below it, a wider curve for the smiling mouth. Goku’s trademark cheerful demeanor shines through his big eyes and wide grin.
- Eyebrows and Ears: Sketch thick eyebrows that follow the upper line of the eyes. Don’t forget the large, distinctive ears – think of them as a sideways “C” shape.
- Expressions: For an added touch, put in Goku’s trademark determined look by adding a furrow in between his eyebrows.
Dressing the Hero: Goku’s Trademark Outfit
Goku’s outfit remains relatively consistent throughout the series, making it easier for beginners to sketch.
- Gi: His martial arts uniform, or gi, is loose-fitting. Use free, flowing lines to capture its essence. Remember, clothes have weight, so they will fold and crease in certain areas, like the elbows and knees.
- Boots and Wristbands: These are simple shapes. Draw two rectangles for the wristbands and elongated ovals for the boots. Add a couple of lines to show the boot’s structure and laces.
The Key to Getting Muscles Right: Less is More
Goku’s physique is a testament to his strength and years of training. But for beginners, it’s essential to remember that sometimes less is more.
- Arm and Leg Muscles: Use gentle curves to hint at the muscles on his arms and legs. Don’t go overboard; subtle lines often achieve more than intricate details in beginner sketches.
- Torso: A couple of light lines can suggest Goku’s abdominal muscles without getting into the nitty-gritty of anatomy.
Making Goku Pop: Simple Shading Techniques
Shading can seem daunting, but a little can go a long way.
- Hair: Add some shadows to the base of Goku’s hair spikes. This provides depth, making the hair look more three-dimensional.
- Face and Body: Use light strokes to add shadows under the chin, neck, and where the arms meet the torso. This brings out Goku’s features more prominently.
Taking Your Art to the Next Level: Practicing with References
Practice makes perfect. Utilize reference images from the series or DBZ Art, a comprehensive library of character designs and poses. By regularly sketching and comparing your work to these references, you’ll see significant improvement over time.
The Mystique of Color: Breathing Life into Goku
When drawing Goku, using color doesn’t merely make your art pop; it infuses it with life, reflecting the vivacity and spirit of the character.
Choosing the Right Palette
Goku’s iconic orange gi, blue undershirt, and boots are immediately recognizable. However, when selecting colors, opt for slightly muted tones to provide a more natural and less cartoonish finish. If you’re using colored pencils, blending is your friend. Mix orange with a touch of brown for his gi, and combine different shades of blue for his clothes and shoes to achieve depth.
The Magic of Skin Tones
Achieving Goku’s skin tone can be a bit tricky. A blend of peach, light brown, and a hint of pink captures his sun-kissed Saiyan skin perfectly. When shading, use the side of your colored pencil to avoid harsh lines, creating a soft gradient.
The Intricacies of Hair and Eye Color
Goku’s jet-black hair and eyes are critical to his look. However, instead of a stark black, go for a dark charcoal or blend black and navy. This provides richness and depth, making it easier to shade and highlight. For his eyes, a touch of red or brown can break the monotony of the black and showcase his fiery spirit.
Embracing Mistakes: Every Stroke Teaches
Drawing, especially characters as intricate as Goku, can lead to inevitable mistakes. But every error is an opportunity in disguise.
The Power of Perspective
Sometimes what might seem like an error can be a matter of perspective. A misplaced line or an irregular shape might just be Goku in a different pose or from a different angle. It’s essential to keep an open mind and use these ‘mistakes’ as learning experiences.
Corrections and Improvements
Don’t be disheartened if you can’t get Goku’s spiky hair right the first time. Use an eraser to make minor corrections or even overlay with another paper to trace and improve. Over time, with consistent practice, the lines will flow naturally.
Detailing: Beyond the Basics
Once you’re comfortable with the basic sketch and coloring of Goku, diving into detailing can elevate your artwork to professional heights.
Facial Expressions: Capturing Emotion
While Goku is often seen with his signature grin, he showcases a plethora of emotions throughout the series. From his determined, battle-hardened gaze to his moments of introspection, experimenting with different facial expressions can be immensely rewarding.
Enhancing the Outfit
While the primary focus tends to be on Goku’s face and physique, paying attention to the details of his outfit can make a difference. Stitching patterns on his gi, wear and tear from battles, or even the creases and folds of his clothes can add a touch of realism.
The Environment: Setting the Scene for Goku
A character like Goku doesn’t exist in a vacuum. The environment and setting play a pivotal role in the Dragon Ball series, and integrating it into your drawings can provide context and depth.
Action Backgrounds
Drawing Goku in the midst of a Kamehameha wave with energy particles and a dynamic background can capture the intensity of a battle scene. Using swirling lines and light effects can evoke the sensation of movement and power.
Serene Landscapes
On the flip side, Goku is often seen training or meditating in serene landscapes. Drawing him against the backdrop of cascading waterfalls, towering mountains, or even by a campfire can depict the calmer, introspective side of his character.
Final Touches: Perfecting Your Art
You’ve drawn, colored, and detailed your artwork. Now, it’s time for the final touches to truly make it shine.
Highlighting and Shading
Using a white pencil or even a gel pen can add highlights, especially to Goku’s hair, eyes, and clothes. These highlights can make the character seem more three-dimensional. Conversely, using a dark pencil or charcoal can add necessary shadows, giving depth and perspective.
Signature Touch
Every artist has a unique style. Whether it’s a particular stroke, a favorite shading technique, or even a signature at the bottom, make sure to leave your personal touch. It’s a stamp of your journey with Goku, a memory of the hours spent creating something truly remarkable.
Brush and Tools: Picking Your Arsenal
Before we dive deep into the specifics of our beloved Goku, it’s essential to equip ourselves with the right tools. Just as Goku needs his staff, artists need their brushes (or pencils).
- Pencil Grades: Begin with a light HB pencil for initial sketches, then move to a 2B or 4B for darker lines.
- Eraser Types: A kneaded eraser helps lift graphite gently, while a plastic eraser offers precision for those tiny details.
- Blending Tools: These are crucial for shading. Stumps or tortillons can smooth out pencil lines, creating a seamless gradient.
- Paper Choice: A medium-weight paper holds pencil well and can endure erasing and layering.
Body Proportions: Getting the Basics Right
The human body, even a Saiyan’s, follows certain proportions. With Goku, certain aspects are exaggerated for dramatic effect.
- Head to Body Ratio: While a real human might be 7.5 heads tall, anime characters like Goku may be closer to 6, giving them a more heroic stature.
- Musculature: Goku’s training has given him a ripped physique. Pay attention to the biceps, triceps, and his broad chest.
- Leg Proportions: Although often covered by his gi, Goku’s legs are sturdy. They’re usually just over half the length of his total height.
Clothing Dynamics: More Than Just Fabric
The way Goku’s clothes sit, fold, and move says a lot about both his physique and the environment.
- Flow of the Gi: Goku’s gi isn’t just a static piece of clothing. It flows, ripples, and even tears. Imagine it as an extension of his body.
- Belt and Symbols: Remember, his belt isn’t always perfectly tied, and the symbols on his gi depict his training lineage.
- Shoes and Wristbands: These accessories can be deceivingly challenging. They have weight and form, so avoid drawing them too flat.
Goku’s Iconic Poses: Capturing the Action
Goku is rarely static. His dynamic poses are a significant part of his character’s charm.
- Battle Stance: Wide-legged, fists ready, and a determined look in his eyes, this is Goku ready for action.
- Flight: Whether it’s the Nimbus cloud or just soaring through the air, Goku’s flight poses exude freedom.
- Charge-Up: Those moments before a massive energy blast are filled with tension. Focus on the energy surrounding him.
Hair Dynamics: More Than Just Spikes
Goku’s hair is a defining feature, especially in his various forms.
- Base Form: Think of his hair as large, individual spikes. Remember, they have volume, not just outlines.
- Super Saiyan: The transformation isn’t just a color change. The hair becomes more erect, symbolizing the surge in power.
- Wind Effect: Whether he’s flying or charging energy, the wind plays with his hair. Use this to show movement.
Eyes and Expressions: Windows to His Soul
Goku’s eyes tell tales of countless battles, losses, and triumphs.
- Base Form Eyes: These are gentler with a rounded bottom and have visible pupils.
- Super Saiyan Forms: The eyes sharpen, and pupils might disappear, replaced with a fierce glow.
- Emotions: Goku’s eyes narrow with determination, widen in shock, and soften in moments of peace.
Incorporating Energy: The Aura Effect
Goku’s energy, or Ki, is a palpable force in the series.
- Glow: Surround Goku with a soft glow, often blue or golden, representing his energy.
- Particles: Tiny sparkles or motes of light can illustrate the intensity of his power.
- Blasts: From the Kamehameha to the Spirit Bomb, energy blasts are a combination of light, particles, and force.
Drawing Companions: Goku Isn’t Alone
Our hero often shares the screen with companions, each bringing out a different facet of him.
- Krillin: Drawing him alongside Goku showcases their deep bond of friendship.
- Vegeta: Their competitive nature shines when you draw them sparring or standing off.
- Gohan: The father-son duo brings out Goku’s softer, protective side.
Contextual Backgrounds: Telling A Story
The setting in which you place Goku can set the mood and tell a story.
- Battle-torn landscapes: Craters, broken rocks, and torn skies show the aftermath of an intense battle.
- Planet Namek: Those distinct horizons and blue-green grasses take us back to Goku’s battle against Frieza.
- Kame House: A serene beach setting, capturing Goku’s moments of respite.
Evolving Through Forms: More Than Just Transformations
Goku’s transformations are physical manifestations of his growth and the challenges he faces.
- Super Saiyan: Beyond the golden hair, focus on the increase in muscle mass and fiery aura.
- Ultra Instinct: This form is all about calm precision. Silver hair, a calm demeanor, but an intense aura of energy.
- Super Saiyan God: With fiery red hair and a leaner physique, this form is about raw divine energy.
The Art of Shading: Breathing Life into Goku
Shading is where your drawing truly begins to pop. It provides depth, making Goku leap from the page, almost as if he’s set to spring into action. Start with identifying the light source in your scene. Is it a glaring sun from the battle on Planet Namek? Or the soft, ambient light of the Hyperbolic Time Chamber? Once you’ve decided, apply shading on the opposite side, remembering that Goku’s chiseled physique offers a landscape of valleys and peaks. Delicate shading on his cheekbones, under his chin, or along his muscular arms can provide a 3D feel. Using a blending stump, or even your finger, can help in smoothing out hard pencil lines.
Perfecting the Dragon Ball Outfit: Goku’s Classic Gi
Goku’s iconic orange gi is more than just clothing; it’s a symbol of his martial arts heritage. When drawing this outfit, remember it’s not just about getting the color or the symbols right, but also understanding its structure and flow. The gi is loose, allowing for his dynamic range of movements. It billows out when he’s airborne and clings when he’s drenched in sweat. The weight of the cloth, its fall, and the way it wraps around Goku’s body – especially during his intense movements – is vital. Note the folds, creases, and even the occasional tear from fierce battles.
The Importance of Perspective: Placing Goku in a Scene
Whether he’s soaring through the clouds or facing an adversary head-on, Goku’s placement in your drawing dictates the story you’re telling. Perspective is pivotal. For a towering presence, place him in the foreground with a worm’s eye view, making him appear even more imposing. For an aerial shot, bird’s eye views with Goku amidst the clouds can create a sense of height and distance. Remember, it’s not just where Goku is, but also how he interacts with his environment. His shadow, reflections in water, or even the way grass might bend or sway near him, can anchor him in the scene, making it cohesive.
Hands and Feet: Often Overlooked but Crucial
Though it might be tempting to hide Goku’s hands in his pockets or his feet behind a rock, they play a vital role in expressing his character. Hands, especially, convey a lot. A clenched fist speaks of impending action, while an open palm, especially in Goku’s signature Kamehameha stance, indicates controlled power. His feet, sturdy and grounded, showcase his firm stance, especially in battle scenarios. When drawing, pay attention to the anatomy. Knuckles, tendons, and even the arch of the foot can lend realism to your Goku artwork.
Details and Accessories: The Finishing Touches
While the broader strokes give life to Goku, it’s the details that breathe soul into him. His torn gi after an intense battle, the beads of sweat on his forehead, or even the battle scars, tell a story. Don’t forget his tail from earlier sagas, a symbol of his Saiyan heritage. Accessories like the four-star Dragon Ball or the Power Pole offer a deeper dive into the lore of Dragon Ball. These intricate details, while minute, give depth to the character and the scene, making your portrayal of Goku not just a drawing but a narrative.
FAQ: Drawing Goku – Your Questions Answered
Why is understanding Goku’s anatomy important?
Understanding Goku’s anatomy is essential because, while he might be a fictional Saiyan, making his physical features believable adds depth and authenticity to your art. It helps the viewer connect better with the character, believing in his powerful stances or dynamic movements. Moreover, a strong grasp of anatomy allows artists to portray Goku in various postures and actions while maintaining consistency.
Can beginners attempt to draw Goku?
Absolutely! Everyone starts somewhere. While Goku’s intricate design might seem daunting initially, breaking down his form into basic shapes can simplify the process. Over time, with practice, beginners can add more details and refine their drawing skills. Remember, every artist, even the professionals, began as a novice.
How important is shading in drawing Goku?
Shading plays a pivotal role in providing depth and dimension to Goku. Without appropriate shading, the drawing might look flat and two-dimensional. Shading helps to emphasize the contours of his muscles, the flow of his gi, and adds a sense of lighting to the overall scene, making Goku appear more lifelike.
Are there specific tools recommended for drawing Goku?
While there’s no strict rule about the tools, many artists prefer using a mix of pencil grades to achieve the varying degrees of line work and shading. Fine liners can help in detailing, and blending stumps are great for achieving smooth gradients. Digital artists often use graphic tablets and software like Photoshop or Procreate, which offer a range of brushes for different effects.
How can I perfect Goku’s hair, one of his standout features?
Goku’s hair, especially in his Super Saiyan forms, is iconic. Begin by understanding its flow and direction. Start with broader spikes and then refine them. Remember, Goku’s hair changes depending on his transformation, so it’s a good idea to have reference images handy. Practice is key. Over time, you’ll find it easier to replicate the distinctive look of his hair.
I’m struggling with drawing Goku’s face. Any tips?
Goku’s face, with its sharp features and expressive eyes, can be challenging. Start with a basic oval shape. Divide it with light vertical and horizontal lines to place his eyes, nose, and mouth proportionally. His eyes are almond-shaped, and eyebrows often furrowed in battle scenes. Use reference images to help you understand the positioning better. With practice, capturing Goku’s facial expressions will become second nature.
How can I add dynamism to action scenes featuring Goku?
Dynamic action scenes often have exaggerated postures. Using reference images or understanding basic action stances can be beneficial. Remember to emphasize movement through flowing clothing, the direction of hair, or even background elements like swirling clouds or debris. Slight blurs or speed lines can also convey rapid movement.
Summary: Simplifying the Art of Drawing Goku Easily
Overview of the Journey
Our journey into the world of Goku’s sketches took us from the very foundation of character drawing to mastering intricate details. We traveled through the realms of his numerous avatars, understanding the nuances that set each apart.
Grasping the Basics
Drawing Goku might seem challenging at first, but when we dissected the task into fundamental elements, we realized it’s about getting the basics right. Recognizing Goku’s foundational shapes, like ovals and triangles for his face and body, provides the necessary roadmap for both beginners and seasoned artists alike.
Embracing the Saiyan Power
Understanding Goku’s Super Saiyan transformations allowed us to appreciate the changes his character undergoes, both in appearance and aura. The iconic golden hair, the fiery aura, and the intense expressions – each transformation added a new layer to our drawing arsenal.
Goku’s Wardrobe and Accessories
Goku isn’t all about muscles and Super Saiyan transformations. His clothing, especially his iconic gi, and accessories like the dragon radar or senzu beans, are integral parts of his character. Our deep dive into these elements ensured that our Goku sketches are authentic and true to the Dragon Ball universe.
Challenges Along the Way
Every artist encounters challenges. For many of us, capturing Goku’s dynamic movements or his intense battle expressions was a hurdle. However, with the tips and techniques shared, we can overcome these challenges, making our sketches more fluid and lifelike.
The Power of Practice
Like Goku’s journey to become the universe’s strongest warrior, our drawing journey is ongoing. With consistent practice and a passion for Dragon Ball’s world, every artist can hone their skills and bring Goku to life on paper effortlessly.
In the end, drawing Goku easily isn’t just about replicating a character; it’s about capturing the essence of a warrior who has inspired millions worldwide. Our guide aimed to make this process simpler and more enjoyable for everyone, ensuring that every artist, irrespective of their skill level, can cherish the joy of sketching Goku.